


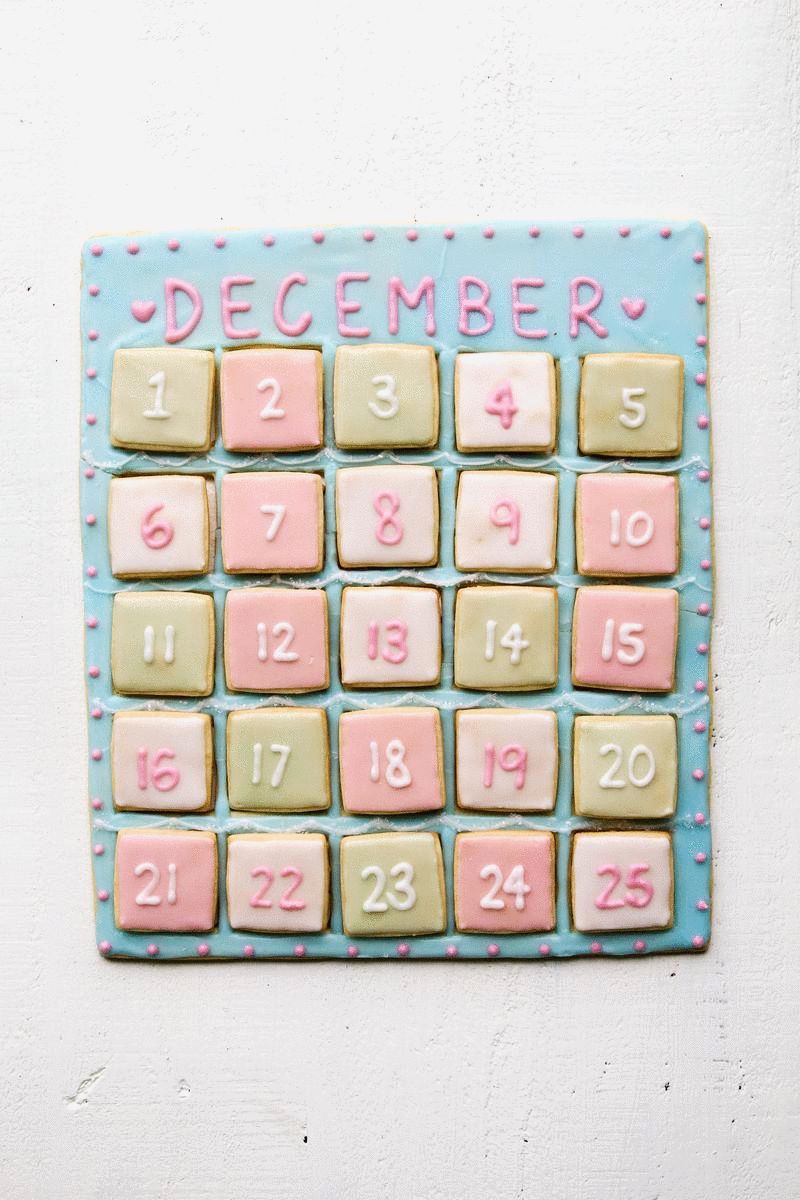
Happy first day of December! Are you surprised that this is not a post about a holiday cookie box? Because I am. Every year when I am in the seventh hour of cookie box making and assembling, I promise myself that I would start my holiday cookie box earlier in December and not wait until the last minute. In the weeks leading up to December, I always contemplate starting my Christmas baking to try and avoid any royal icing-induce meltdowns closer to the holidays. Guess what? Once again I will be making my cookie box mid-December, but this year I have a good reason to delay the cookie box. Besides the fact that it is not as fun to be making Christmas cookies in November, the reason I am pushing my holiday box aside is that I wanted to make this — a 100% edible gingerbread advent calendar I saw over on CBC. A cookie advent calendar is more straightforward than a cookie box because you only need one type of dough for the entire project. I chose sugar cookie because it is one of my favourite cookies despite its simplicity. Shortbread, gingerbread, or any cookie that does not lose its shape when baked would also be great for this. I toyed around with the idea of baking 25 different types of cookies (insane) for this calendar instead of 25 uniquely decorated cookies (still insane but less so). I quickly tossed that idea away because baking 25 different types of cookies means I would end up with over 300 cookies in my house because one cannot really bake just one cookie from any cookie recipe and I was not quite ready for that level of commitment. Just using one dough for this project was commitment enough already.

The hardest part about making an entirely edible cookie advent calendar is not setting aside the time you need to decorate the calendar, but measuring, cutting, and creating the calendar itself. It took me quite a while to decide how large I want the calendar itself (because that will determine how big or small you need to make the cookies behind the doors). The larger the frame of the calendar, the easier it is to make and decorate the cookie inserts, but the harder it is to transport the frame in/out of the oven and off the baking sheet. My original frame was too large and did not fit in my oven (oops) so I had to gather my dough and re-roll it to make this one. Measure your baking sheet first and then decide how large your calendar can be. You also need to do this in a timely fashion because a chilled dough is much easier to work with. A warmer, softer dough means it will be harder to cut and maintain straight lines and edges for the calendar frame. Those are the two main things to keep in mind when making a cookie advent calendar, and the rest is the same as making regular decorated sugar cookies. Oh! One last thing before we move on to the steps of making a cookie calendar — remember that cookies (even the most chilled cookie dough) will expand a tiiiiiiny bit when baked. So when you are making the inserts for each window, allow a little wiggle room around the cookie to make sure it will fit in the frame and behind the cookie door that will lay on top of it.


Happy baking and happy holidays!

How to make your own fully-edible cookie advent calendar
Equipment
- Your favourite sugar cookie dough (I made a double batch to make sure I do not run out of dough)
- A large baking sheet
- Square cookie cutter (for the windows)
- Assorted cookie cutters (for the inserts)
- Royal icing and other cookie decorations
- Piping tips
Instructions
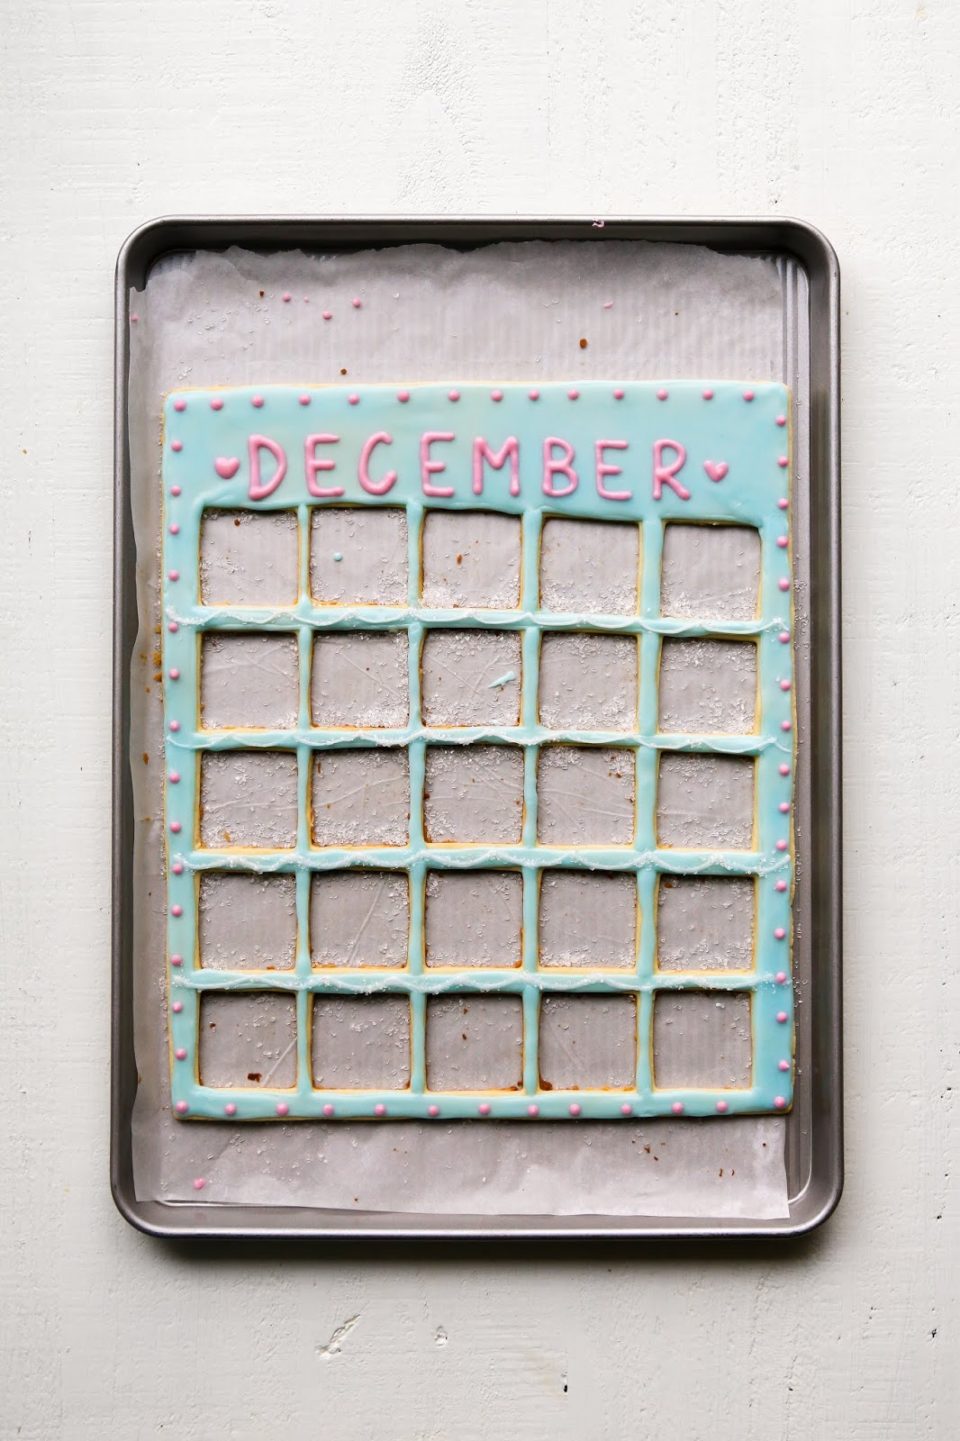
- Make your favourite sugar cookie or shortbread dough according to the instructions, divide the dough into two equal portions, and chill the dough until firm. After chilling, roll out one portion of the dough into a rectangle that 1/4-inch in thickness. With a ruler or measure tape, measure out a large rectangle. I made my calendar 13 x 15 inches. Trim off the excess dough and transfer rectangle to a large baking sheet lined with parchment paper. It is important to transfer the dough the the baking sheet BEFORE punching out the windows. If the dough has softened at this point, return the baking sheet to the freezer and chill for 10 minutes.
- Using a square cookie cutter (I used a 2-inch square cutter), punch out 25 squares in a 5-by-5 pattern from the bottom of the rectangle, allowing an equal amount of space between each square. This will leave enough room to write ‘DECEMBER’ at the top of the calendar when decorating. Once the frame has been shaped and windows have been cut, return baking sheet to freezer and chill for at least 15 minutes before baking. A chilled dough means less expanding in the oven and we want the cookie to retain its shape. Gather and re-roll the dough leftover from punching out the windows and wrap in plastic wrap and allow dough to chill in the refrigerator.
- While the frame is chilling, roll out the second portion of dough (not the one you just gathered from making the frame) use the same square cookie cutter to cut 25 squares for the doors and place on a baking sheet. Use the remaining dough you just rolled out and the dough you have been chilling to cut out 25 cookies that will be behind each of the doors.
- Bake the chilled frame, doors, and cookie inserts according to the instructions of your favourite recipe. Keep an eye on the frame when it is baking because the thin borders of the calendar will take less time than the other cookies. Remove from oven when ready and allow the cookies to cool completely before decorating.
- Decorate the cookies and allow cookies to fully dry before assembling the calendar. You do not want to place a door on top of a cookie that has not fully dried.
- Once cookies have fully dried, place cookie inserts into each cavity of the calendar. Gently place the doors on top of each cookie. Admire all your hardwork. Then enjoy!


Suzon Ali says
I want to share your joy with others. I strongly believed that it is an excellent work. But on here you will find SSC Exam Result 2020 Publish Date without any confusion. No confusion for DNC New Job Circular or 41th Bcs result/" also. Be sure of it now. Accurate is also the following Baaghi 3 Movie Download from here that DGFood Admit Card Downloadvery important issue.