x
  • Home
  • Recipes
  • Press
  • About
  • Let’s talk!
Instagram Pinterest BlogLovin
Home › recipes › Recreating The Rebel Within Muffin

FacebookTweetPin

  • Instagram
  • TikTok
  • Pinterest
  • Skip to primary navigation
  • Skip to main content
  • Skip to primary sidebar
  • Skip to footer
Constellation Inspiration

Constellation Inspiration

A Dessert Blog

  • Cookbook
  • Tutorials
  • About
    • Press
  • Contact
  • Recipes:
  • Asian-inspired
  • cake
  • cookies
  • cream puffs
  • tarts
  • bars
  • candy
  • seasonal
    • Valentines
    • halloween
    • christmas
Jump to Recipe
recipes

Recreating The Rebel Within Muffin

by: Amy on: Apr 2, 2023

This is inspired by the famous Rebel Within muffin from Craftsman and Wolves in San Francisco. A savoury muffin studded with cheddar, parmesan and chives encases a beautifully runny egg. The hardest part about making the Rebel Within is figuring out the timing of the egg but it is so satisfying when you cut into it and the yolk oozes out!

Review  or  Print Recipe

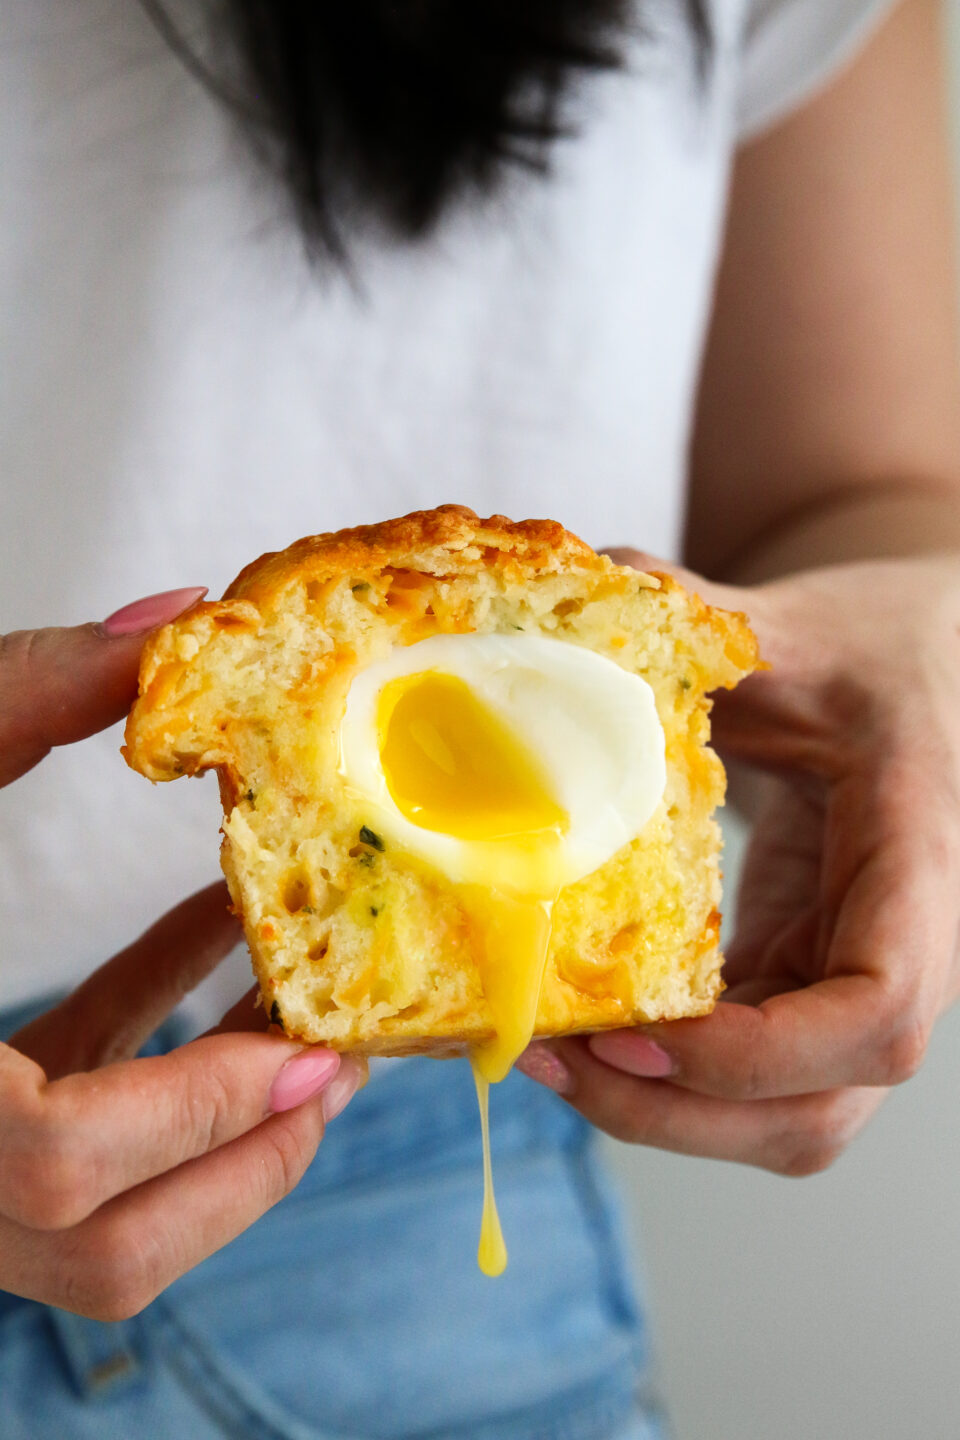
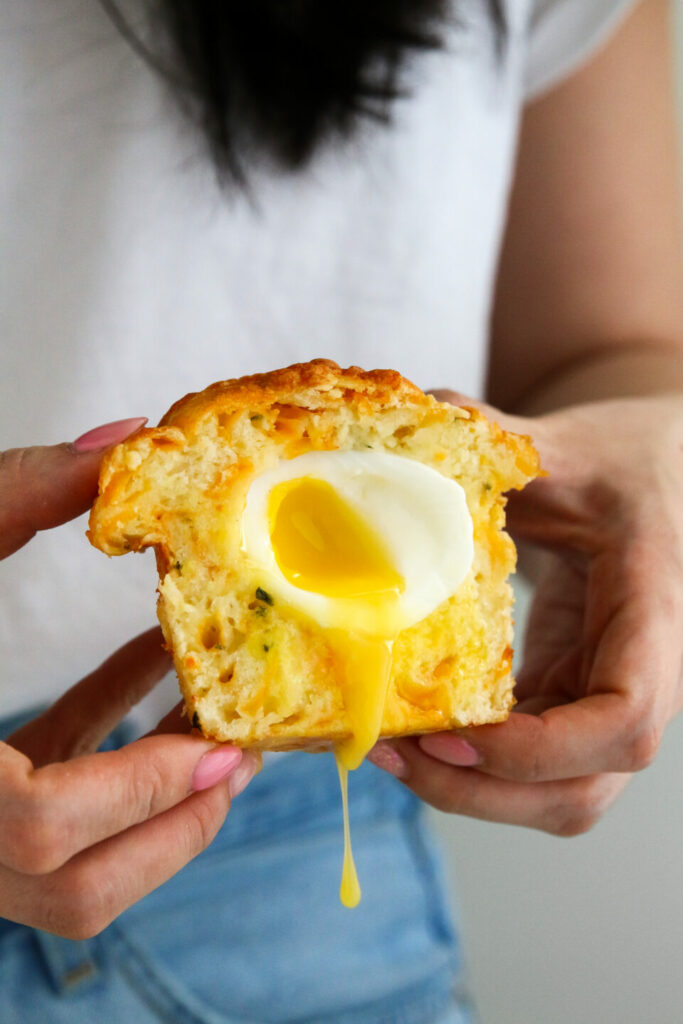
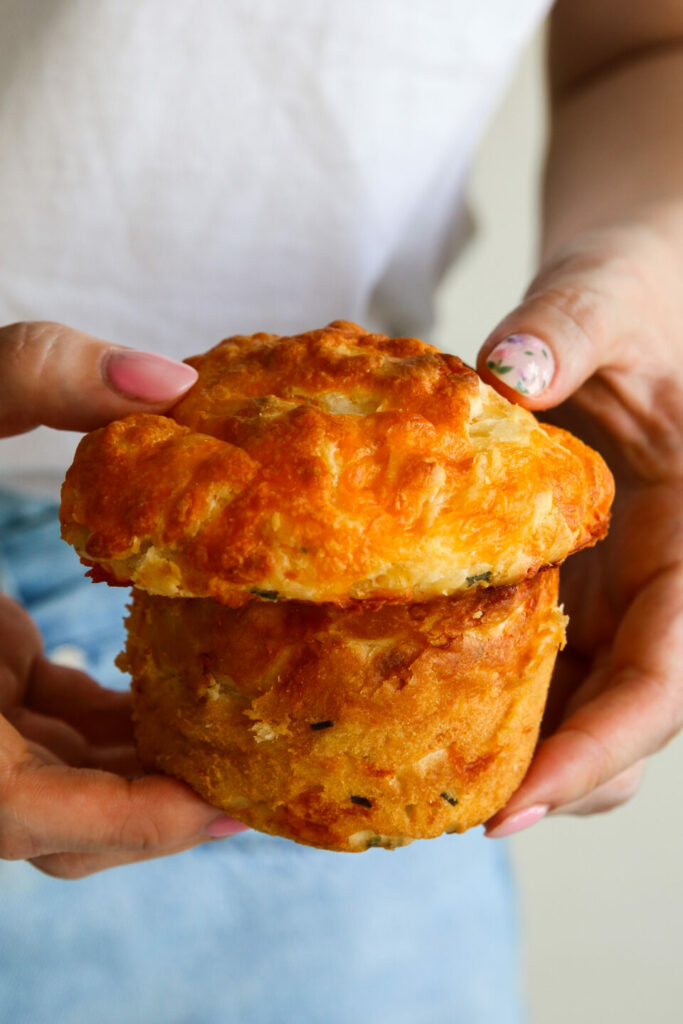
It has been eight years (what?!) since my last trip to San Francisco, but I still remember certain parts of my trip so clearly as if my last trip wasn’t in 2015. I met Michelle of Hummingbird High for the first time on that trip and we bonded over waffles and coffee. Then I tried Tartine’s lemon tart for the first time, which is now my favourite lemon tart of all time. Another standout (of course it’s food related) was going to Craftsman and Wolves and ordering everything in their pastry case with new friends Jenn, Susannah, and Dafna. Everything was great but I was on a mission to try their Rebel Within muffin. Mission accomplished. I’m sure you’ve seen the muffin before — it has become quite a pastry celebrity ever since CaW started making them. From the outside, it may look like a normal savoury muffin but the cheesy muffin studded with green onions and sausage encases the perfectly runny egg in its centre. It’s served with a little vial of tabasco salt on the side. Eater has a great breakdown of this muffin if you want to learn about it. Ever since I had that muffin inside the bakery, I told myself I would try to recreate it at home. I did have one semi-successful attempt a few years ago but then my desire to recreate it and produce a consistent recipe got eclipsed by many failed attempts.

The hardest part about making the Rebel Within is figuring out the timing of the egg so that the whites are cooked but the yolk stays perfectly runny after two rounds of cooking. The egg is first boiled in water and then it gets cooked again when it is placed in the muffin batter and baked. Conceptually, you want to place a very soft boiled egg in the centre of the muffin batter but realistically it is quite difficult to peel the very soft boiled egg. When the egg is barely cooked, it tends to stick to the shell and tear when you remove it. Or the egg whites are still so wobbly that the yolk falls out of the egg. At first I tried a 2.5-minute boiled egg, which was almost impossible to peel. A 3.5-minute boiled egg is still very runny when you place it in the muffin batter but after it is baked in the muffin again, the yolks are firmer than I would like. Which is fine if you prefer more of a medium egg. I found that an egg boiled for 2 minutes and 45 seconds to 3 minutes is perfect. Three minutes and 15 seconds is fine but is pushing it a bit and doesn’t guarantee consistency results every time you cut open the muffin.

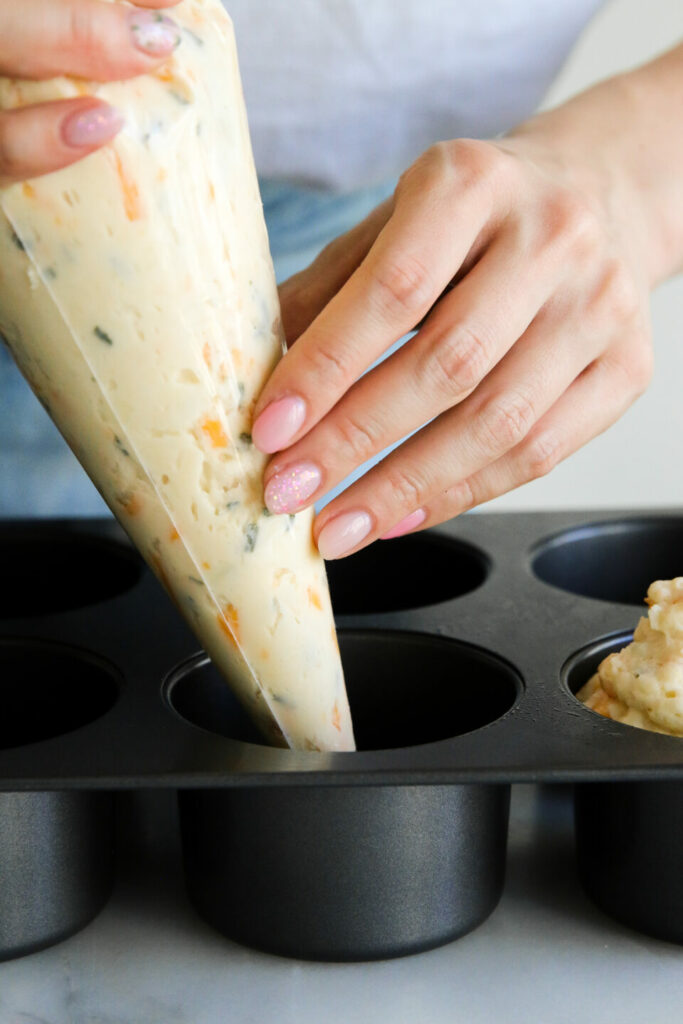
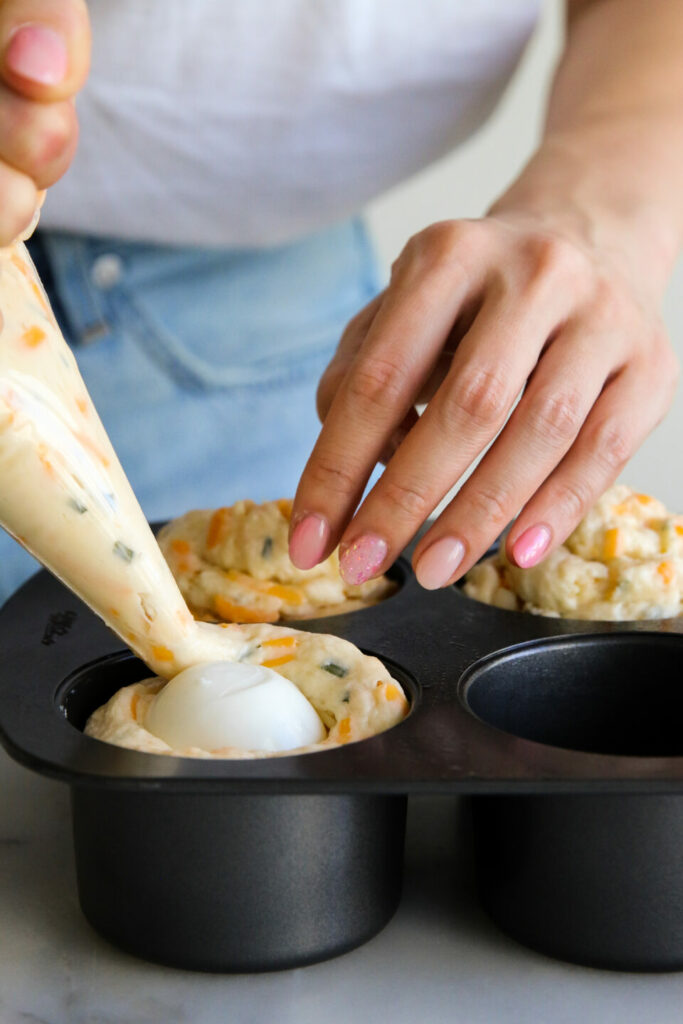
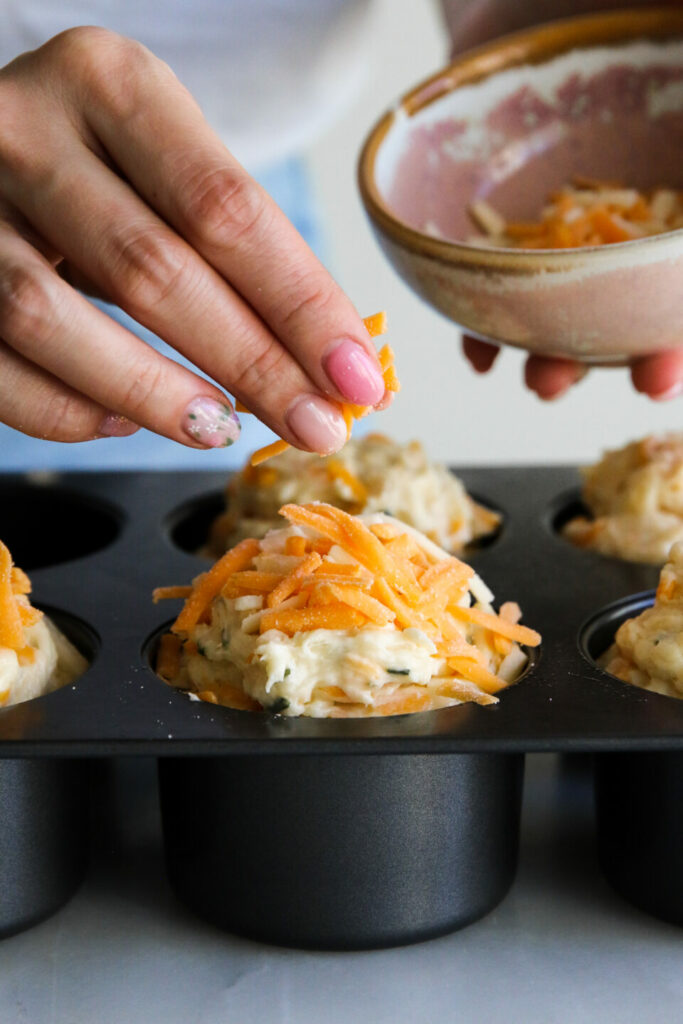
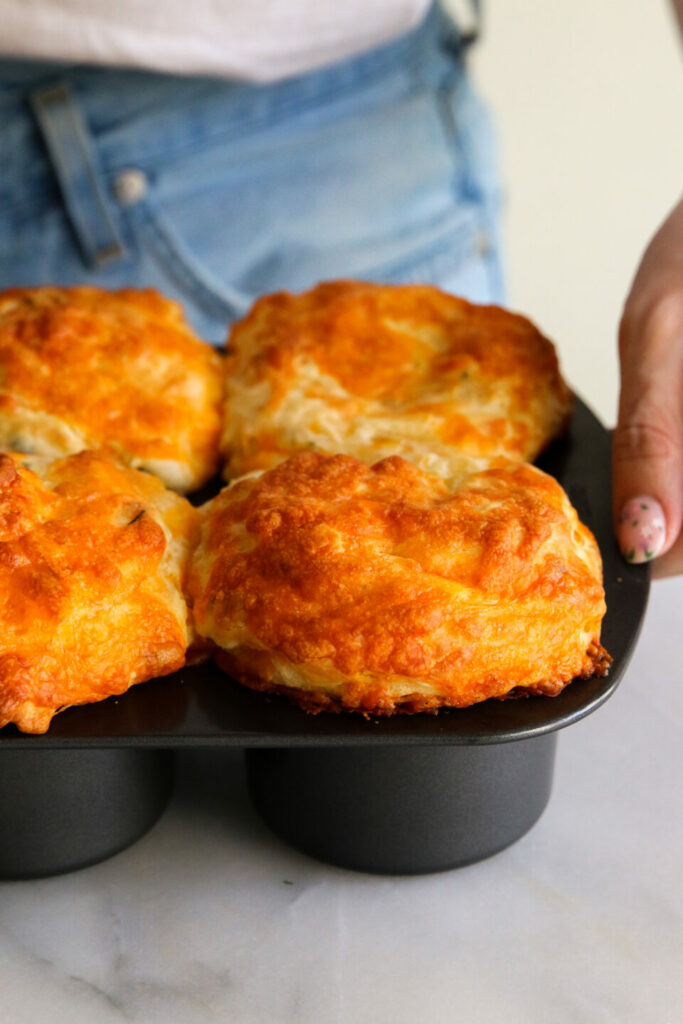
Next is the savoury muffin batter. The original Rebel Within has house-made sausage studded throughout the muffin but since I’m not a meaty gal, I omitted the meat in the batter and added more cheese to bump up the flavour and salt content. From Eater’s thorough breakdown, you see that a lot of the moisture comes from creme fraiche, but I found that sour cream works just as well if you aren’t able to find creme fraiche. For the batter, we start off whisking together the usual suspects: all-purpose flour, baking powder and soda, a bit of sugar and salt. Then we add the liquid ingredients which is a mixture of sour cream, eggs, and melted butter. My cheeses of choice are cheddar and parmesan. I love the addition of parmesan and found the muffin to taste a little flat when it is made with just cheddar. Chives are optional but I like the flavour and colour it adds. After you make the batter (which is going to be quite thick!), I transferred it to a piping bag so I can fill the muffin tin more easily. Before assembling the muffin, light dust the soft boiled eggs with a bit of flour — this will help the egg stay in place as well as absorb any excess liquid that tends to gather around the egg in the muffin. Fill the bottom of a large muffin pan or popover pan with a bit of the batter, carefully place the floured egg in the centre and continue to pipe the batter around and on top of the egg. Don’t overfill the muffin tin too much or else the muffin will need more time to bake through and there is increased chance that the egg will overcook. Top with more cheese and then bake. Baking it at 400F gives it great lift and it should be taken out of the oven at the 16 – 17 minute mark. I don’t recommend leaving the muffin in there for more than 18 minutes. If your first batch is a bit overcooked, don’t get discouraged. It took me many tries (and many cartons of eggs) to really figure it out, but I hope this works as a good starting point for you. Enjoy the muffin when it’s fresh —It’s most satisfying when enjoyed warm.

The Rebel Within Muffin

This is inspired by the famous Rebel Within muffin from Craftsman and Wolves in San Francisco. A savoury muffin studded with cheddar, parmesan and chives encases a beautifully runny egg. The hardest part about making the Rebel Within is figuring out the timing of the egg but it is so satisfying when you cut into it and the yolk oozes out!
Makes 6 large muffins
By Amy

Ingredients

Soft-Boiled Eggs

  • 6 large eggs

Savoury Muffin Batter

  • 240 g (2 cups) all-purpose flour
  • 39 g (3 tbsp) granulated sugar
  • 1 tbsp baking powder
  • 1 tsp salt
  • 1/2 tsp baking soda
  • 240 g (1 cup) full-fat sour cream, room temperature
  • 2 large eggs, room temperature
  • 57 g (1/4 cup) butter, melted
  • 3 tbsp milk
  • 200 g (2 cups) shredded cheddar cheese
  • 100 g (1 cup) shredded parmesan cheese
  • 1 tbsp chives, finely chopped

Instructions

Soft-Boiled Eggs

  • Fill a bowl with warm water and place eggs in the bowl.
  • Bring a medium pot of water to a boil. Slowly lower the eggs into the boiling water. Set timer for 2 minutes 45 seconds* (See note)
  • While eggs are boiling, create an ice bath in a bowl.
  • Once timer is up, remove the eggs from the pot and place into the bowl of ice water. This will stop the eggs from cooking further.
  • Once eggs are cool enough to touch, very carefully peel the eggs. Gently tap the egg on the counter to crack the shell. Start peeling from the cracks in the wide end of the egg. The hardest section to peel is the narrowest part. If the white sticks to the shell in one spot, try from a different spot. 
  • Once all the eggs are peeled, place on a plate and place in the freezer while you make the muffin batter.

Savoury Muffin Batter

  • Preheat oven to 400F and grease a large muffin/popover pan. Grease the top of the muffin pan generously. Set aside.
  • In a large bowl, whisk together flour, granulated sugar, baking powder, salt, and baking soda.
  • In a medium bowl, whisk together sour cream, eggs, and melted butter, and milk.
  • Pour the liquid mixture into the dry mixture, and stir with spatula until ingredients are mostly combined.
  • Add 75% of the cheddar cheese, all of the parmesan cheese, and chives and mix until evenly distributed. The batter will be thick.
  • Transfer the batter to a piping bag. Pipe a thin later of batter to the bottom of the muffin pan. Place a chilled soft boiled egg in centre. Continue to pipe the batter around and on top of the egg. Be generous when piping batter on top of the egg because the batter will slide off a little as it bakes.
  • Top each muffin dome with the reserved cheddar cheese.
  • Bake muffins for 16 minutes rotating halfway through the baking time. The tops of the muffins should be golden brown.
  • Allow muffins to cool in pan for 5 minutes. As these muffins cool, it will continue to cook the egg. Using an offset spatula or butter knife, carefully go around the sides of the muffin to loosen it from the pan. Once it is no longer sticking to the sides of the pan, remove the muffins.
  • Enjoy warm.

Notes

*I found that an egg boiled for 2 minutes and 45 seconds to 3 minutes is perfect. A three minutes and 15 seconds egg is much easier to peel but doesn’t guarantee consistency results every time you cut open the muffin.

more like this:

Lunar New Year Cookie Box 2026

Gingerbread Greenhouse 2025

Taiwanese Breakfast Cookie

Reader Interactions

Leave a Reply Cancel reply

Your email address will not be published. Required fields are marked *

Recipe Rating


Sweet Comments:

  1. Tiffany says

    Apr 7, 2023 at 11:43 pm

    Excited to make this! Is the butter salted or unsalted?

    Reply
  2. Tiffany says

    Apr 8, 2023 at 12:24 am

    Sorry, a couple more questions!. Did you use table salt or Diamond kosher? And is your pan cast iron?

    Reply
    • Angie says

      Apr 28, 2023 at 1:17 pm

      If kosher salt isn’t specified, it’s safe to assume it’s table salt.

      I don’t think it matters much whether you use salted or unsalted butter. It’s up to your taste preference.

      From the photos in the write up, her pan does not look like it’s cast iron.

      Hope that helps! I’m trying my hand at these today!

  3. Sabrina says

    Apr 15, 2023 at 3:29 pm

    5 stars
    thank you for recreating this muffin, love savory muffins and have never had one as creative as this!

    Reply
  4. Angie says

    Apr 29, 2023 at 3:57 am

    5 stars
    This recipe is awesome! I made these tonight and they turned out almost perfect! The muffin texture is incredible and it’s so satisfying to cut into the muffin and have a beautiful flowing yolk.

    A few tweaks I’m gonna try next time just to account for the experience I had with my ingredients and oven and other variables:

    1. I’m going to give the eggs another 15-20 seconds (I did 2:45 and they were both extraordinarily difficult to peel without the entire egg falling apart and they were actually still slightly underdone after baking).

    2. I’m going to store the eggs in the fridge and not the freezer after peeling while I get the batter together. The batter just around the perimeter of my eggs was still uncooked and I think that was due to the egg being too cold.

    3. I went with 17 minutes for baking but I’m going to try 18 next time, and/or I may add another 5° to the oven temp.

    4. I am going to let them cool in the muffin tin for 10-15 instead of 5 before removing them, to ensure structural integrity.

    Those are just my notes to keep experimenting so I can get them perfect with the variables my kitchen has.

    Thank you so much for this recipe and the jumping off point for my experimentation with these. This is the second amazing recipe of yours I’ve tried and they are both showstoppers (the other was the creme brulee puffs).

    Reply
    • Natalie says

      Dec 26, 2025 at 7:48 pm

      Did your adjustments work?

  5. Jess says

    May 31, 2023 at 12:26 pm

    1 star
    Not one aspect of this recipe worked. Eggs were so underdone they were impossible to peel and keep intact. This issue was coupled with a batter so thick I couldn’t encase the incredibly delicate egg without busting the yolk. Threw out everything. Didn’t even get it in the oven. Complete waste of ingredients.

    Reply
  6. Laurie says

    Jun 2, 2023 at 2:13 pm

    5 stars
    Delicious! I had a bit extra dough and ended up making a plain muffin. It was soo good!
    I just have a hard time peeling the egg without it breaking, but the recipe itself was amazing.

    Reply

Primary Sidebar

a sweet hello.

Welcome to Constellation Inspiration, a buttercream-coated journal of recipes, stories, and love letters that are sweet to read, and even sweeter to eat. These love letters are dedicated to you.

sneak peaks & bonus recipes!

Sign up to get them for free:

featured

Archives

  • March 2026
  • December 2025
  • November 2025
  • September 2025
  • August 2025
  • May 2025
  • April 2025
  • March 2025
  • November 2024
  • October 2024
  • September 2024
  • August 2024
  • July 2024
  • June 2024
  • May 2024
  • April 2024
  • March 2024
  • February 2024
  • January 2024
  • December 2023
  • October 2023
  • September 2023
  • July 2023
  • June 2023
  • April 2023
  • March 2023
  • February 2023
  • January 2023
  • December 2022
  • October 2022
  • September 2022
  • July 2022
  • June 2022
  • May 2022
  • April 2022
  • March 2022
  • February 2022
  • January 2022
  • December 2021
  • November 2021
  • October 2021
  • September 2021
  • July 2021
  • June 2021
  • May 2021
  • April 2021
  • March 2021
  • February 2021
  • December 2020
  • October 2020
  • September 2020
  • August 2020
  • June 2020
  • May 2020
  • April 2020
  • March 2020
  • February 2020
  • January 2020
  • December 2019
  • November 2019
  • October 2019
  • September 2019
  • August 2019
  • July 2019
  • June 2019
  • April 2019
  • March 2019
  • February 2019
  • January 2019
  • December 2018
  • November 2018
  • October 2018
  • September 2018
  • August 2018
  • July 2018
  • May 2018
  • April 2018
  • March 2018
  • February 2018
  • January 2018
  • December 2017
  • November 2017
  • October 2017
  • September 2017
  • August 2017
  • July 2017
  • June 2017
  • May 2017
  • April 2017
  • March 2017
  • January 2017
  • December 2016
  • November 2016
  • October 2016
  • September 2016
  • July 2016
  • June 2016
  • May 2016
  • April 2016
  • March 2016
  • February 2016
  • December 2015

Categories

  • Asian-Inspired
  • bars
  • bread
  • brownies
  • cake
  • cake decorating
  • candy
  • chocolate
  • christmas
  • cincinnati
  • Cookbook
  • cookbook club
  • cookie box
  • cookies
  • cream puffs
  • cupcakes
  • easter
  • fall
  • fruit
  • gingerbread
  • halloween
  • holidays
  • ice cream
  • layer cakes
  • Life
  • recipes
  • seasonal
  • spring
  • summer
  • tarts
  • tutorials
  • Valentines
  • vancouver
  • wander
  • winter

Meta

  • Log in
  • Entries feed
  • Comments feed
  • WordPress.org

link to follow on instagram  link to follow on Pinterest  Follow on Bloglovin

day two: sparkly matcha neapolitan shortbread cook day two: sparkly matcha neapolitan shortbread cookies ✨

the instructions might seem confusing, but if you watch the video to see how the different flavour layers are stacked, it will make much more sense! these slice and bake cookies freeze extremely well so you can make the dough now and bake them off when you want to gift them. (makes 40-44)

vanilla dough:
85g (1/3 cup + 2 tsp) unsalted butter, room temp
45g (6 tbsp) powdered sugar
2 tsp vanilla
90g (3/4 cup) all-purpose flour
1/4 tsp salt

matcha dough:
85g (1/3 cup + 2 tsp) unsalted butter, room temp
45g (6 tbsp) powdered sugar
90g (3/4 cup) all-purpose flour
2 tsp culinary matcha powder
1/4 tsp salt

strawberry dough 
85g (1/3 cup + 2 tsp) unsalted butter, room temp
45g 6 tbsp) powdered sugar
90g (3/4 cup) all-purpose flour
2 tbsp freeze-dried strawberry powder 
1/4 tsp salt

1 egg white
coarse sanding sugar

for the vanilla dough, combine butter and powdered sugar in a bowl. mix until smooth. add vanilla. add flour and salt and mix until no dry streaks remain. do the same for the matcha and strawberry doughs in separate bowls

place one portion of the dough between two pieces of parchment paper and roll into a 5 x 9-inch rectangle that is about 1/4-inch thick. slide rolled out dough onto a baking sheet and freeze for 10 min until firm. repeat this step with the other portions of dough

remove the top piece of parchment from each slab and stack the strawberry, vanilla, and matcha dough layers. cut the slab down the middle the long way to form two 2.5 x 9-inch rectangles. with one half, carefully swap the order of the layers (example: if the first half of the dough is stacked svm, swap the second half so it’s msv. this will ensure that same flavour squares don’t stack on each other). stack the halves. press the layers gently to adhere them. return the stacked dough to the freezer for another 10min

[recipe cont’d in comments]

#christmasbaking #christmascookies #holidaybaking #holidaycookies #cookiedecorating
day 1: rudolph rings 🦌✨ piped butter cookies day 1: rudolph rings 🦌✨

piped butter cookies are some of my fav cookies to make — they’re buttery! sandy! rich! they get a little holiday makeover and become the cutest rudolph rings when you add a little red m&m nose and antler details. topping the antlers with gold is optional, but adds extra sparkle and festive cheer to each cookie

(makes 12 cookies)
135 g salted butter, very soft
45 g icing sugar
100 g flour
40 g cornstarch
15 g cocoa powder 
1/4 tsp espresso powder 

in a medium bowl, combine softened salted butter with icing sugar with a rubber spatula until smooth

in a separate bowl, whisk together flour, cornstarch, cocoa powder, espresso powder, and salt

using a rubber spatula, fold in the dry ingredients into the butter-sugar mixture until no more dry spots remain

transfer the dough into a piping bag fitted with a large open star tip (i used wilton 6b)

apply pressure to pipe the dough onto the prepared baking sheet. if you are having trouble piping out the dough, you can warm up the dough in the piping bag between the palms of your hands, or add an extra 1 tbsp of melted butter to the dough and refill the piping bag. leave 1 inch between each cookie

transfer the sheet of piped cookies to the freezer while you preheat the oven to 325f. chilling the dough will prevent the cookies from spreading in the oven

bake the cookies until the bottoms are set, about 25 – 30 minutes

allow the cookies to cool on the baking sheet for 5 minutes before transferring them to a cooling rack to cool completely and decorate

royal icing
1 egg white
150 g icing sugar
1/4 tsp vanilla extract 

in the bowl of a stand mixer or large mixing bowl, beat egg whites on medium-low speed until frothy, about 1 min. with the mixer on low speed, slowly add icing sugar and vanilla. once incorporated, increase speed to medium-high and beat until stiff peaks form. transfer icing to a pip bag with a small round tip to pipe out face details

#holidaybaking #christmascookies #christmascookie #holidaycookies #christmasbaking
sorry i cant come to the phone right now, i’m to sorry i cant come to the phone right now, i’m too busy baking all the @nytcooking holiday cookies the day they’re released

@csaffitz bûche de noël cookies
@samanthaseneviratne ginger cheesecake cookies
@heysueli matcha-black sesame shortbreads
@ericjoonho lemon-turmeric crinkle cookies
@clarkbar iced peppermint cookies
@sohlae holiday rocky road
@vaughn rum-buttered almond cookies

#nytcooking #nytcookieweek #nytcookies #holidaybaking #christmascookies
presenting: this year’s 12 days of christmas coo presenting: this year’s 12 days of christmas cookies 🎄

matcha christmas tree cookies 
chocolate reindeer cookies
matcha strawberry neapolitan checkerboard
hojicha walnut deer cookies (with a bow!)
hedgehog hazelnut praline shortbread
pretzel shortbread mittens
earl grey decorated wreath cookies 
snowman cookie butter truffles
grinchy pistachio jammy liners
eggnog brûlée cookies
biscoff snowman cookies
chestnut hazelnut praline sandwich cookies

…dropping tomorrow! stay tuned!

#christmasbaking #christmascookies #holidaybaking #holidaycookies #cookiedecorating
preparing for the big weekend… ✨ a tradition preparing for the big weekend… ✨

a tradition that i started in 2019, this will be the sixth year i bake all of the @nytcooking holiday cookies the moment they are released on dec 1. i’m excited/nervous for sunday (i might throw up). here are the cookies from previous years, and a few behind the scenes where you can witness me slowly lose my sanity.

2019: twelve cookies by @susanspungen
peppermint stripe cookies
color-field cookies
peanut shortbread with honeycomb
gingery brownie crinkle cookies
marbled tahini cookies
homemade pocky
abstract art cookies
stamped citrus shortbread
brown sugar-anise cookies
thumbprints with dulce de leche
blood orange poppyseed window cookies
dirty chai earthquake cookies

2020:
cornmeal lime shortbread fans
sparkly gingerbread
vanilla bean spritz cookies
toasted almond snowballs
honey-roasted peanut thumbprints
black and white brownies 
fudgy bourbon balls
cherry rugelach with cardamom sugar

2021: the year that @nytcooking released 24 holiday cookie recipes and i almost passed out/away
m&m cookies
almond spritz cookies
peppermint brownie cookies
brown-butter toffee sandwich cookies
hibiscus-spiraled ginger cookies
guava and cream cheese twists
minty lime bars
chewy gingerbread
savory mixed-nut shortbread
tahini thumbprints with dulce de leche
chocolate babka rugelach
fruity meltaways
iced oatmeal cookies
spiced orange crumble cookies
peanut butter cookies
gingerbread biscotti
cheddar cheese coins
fig and cherry cookie pies
italian rainbow cookies
chocolate-cherry ginger cookies
hindbaersnitter
no-bake chocolate clusters
torticas de morón
piparkakut

2022:
white chocolate macadamia nut cookies
gochujang caramel cookies
chocolate hazelnut cookies
gingerbread latte cookies
orange, pistachio and chocolate shortbread
crunchy coconut twists
savory shortbread with olives and rosemary

2023: last year’s seven cookies which was done after ten hours of baking
gingerbread blondies
mexican hot chocolate cookies
rainbow rave cookies
lemon butter curls
matcha latte cookies
technicolor cookies
neapolitan checkerboard

#nytcooking #nytcookies #nytcookieweek #christmascookies #holidaycookies

Footer

Recipe Index
About
Press
Contact
Legal

sneak peeks & bonus recipes!

Sign up to get them for free:

© 2026 Constellation Inspiration · Site by Meyne