x
  • Home
  • Recipes
  • Press
  • About
  • Let’s talk!
Instagram Pinterest BlogLovin
Home › Asian-Inspired › Taro Coconut Snowy Mooncakes

FacebookTweetPin

  • Instagram
  • TikTok
  • Pinterest
  • Skip to primary navigation
  • Skip to main content
  • Skip to primary sidebar
  • Skip to footer
Constellation Inspiration

Constellation Inspiration

A Dessert Blog

  • Cookbook
  • Tutorials
  • About
    • Press
  • Contact
  • Recipes:
  • Asian-inspired
  • cake
  • cookies
  • cream puffs
  • tarts
  • bars
  • candy
  • seasonal
    • Valentines
    • halloween
    • christmas
Jump to Recipe
Asian-Inspired

Taro Coconut Snowy Mooncakes

by: Amy on: Sep 24, 2018

Happy Mid-Autumn Festival! I did not intend on making more mooncakes this year after making the baked taro and purple yam with salted egg yolk mooncakes last weekend. I had so much taro leftover from the previous week and...

Review  or  Print Recipe

Happy Mid-Autumn Festival! I did not intend on making more mooncakes this year after making the baked taro and purple yam with salted egg yolk mooncakes last weekend. I had so much taro leftover from the previous week and I found two other sets of mooncake molds, that it only seemed appropriate to be extra festive and make more mooncakes this weekend. Even though it might be a bit too late to share this recipe (though I highly encourage making these the day of Mid-Autumn), it is too good not to share.

Unlike traditional mooncakes, snowy or ‘snow skin’ mooncakes are not baked. Snowy mooncakes can have similar fillings as traditional mooncakes but their wrappers have a soft and chewy mochi-like consistency rather than the consistency of a pastry dough. The wrapper dough takes on whatever colour you want it to be. A teaspoon of matcha powder could be added to make a beautiful green mooncake and beetroot powder could create many shades of pink. Next year, I will make snowy matcha mooncakes filled with custard, please hold me to that. 

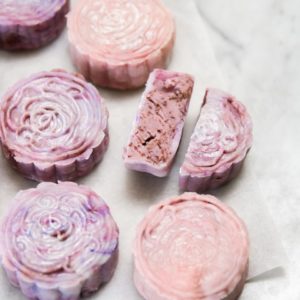
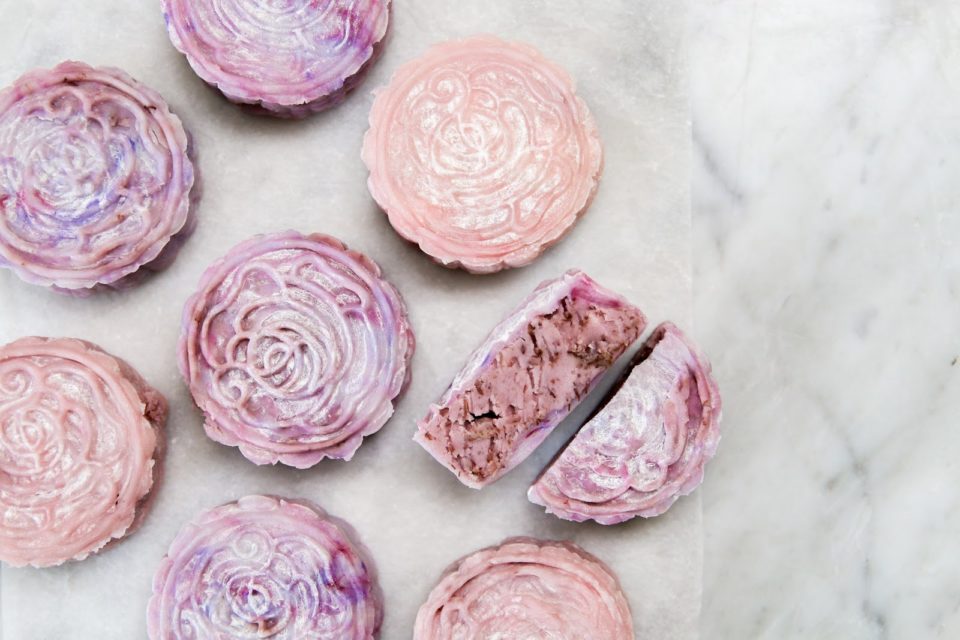
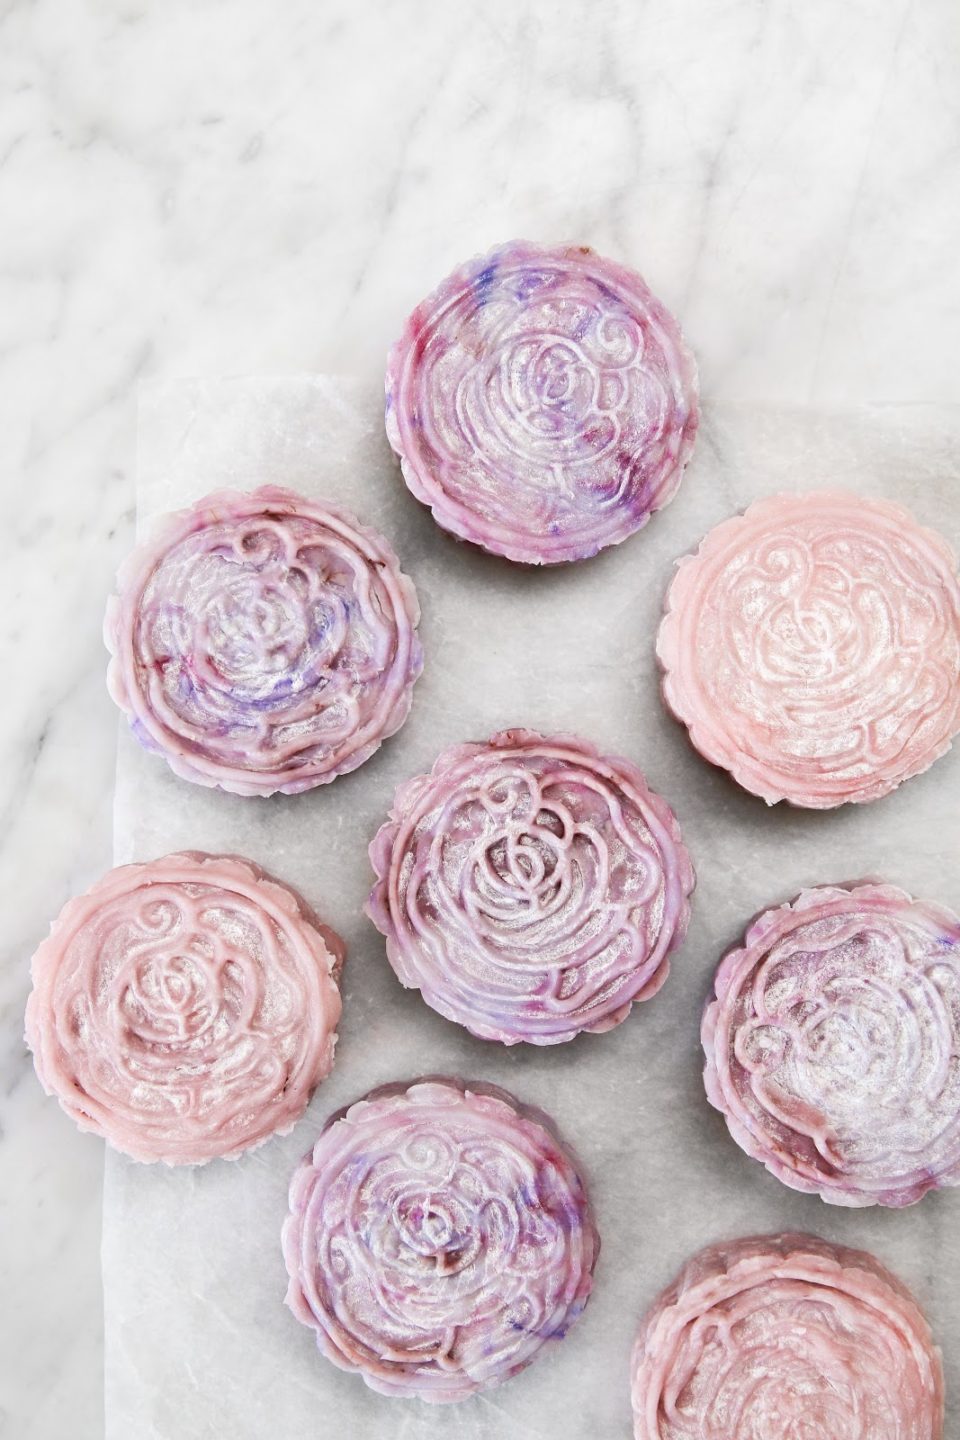
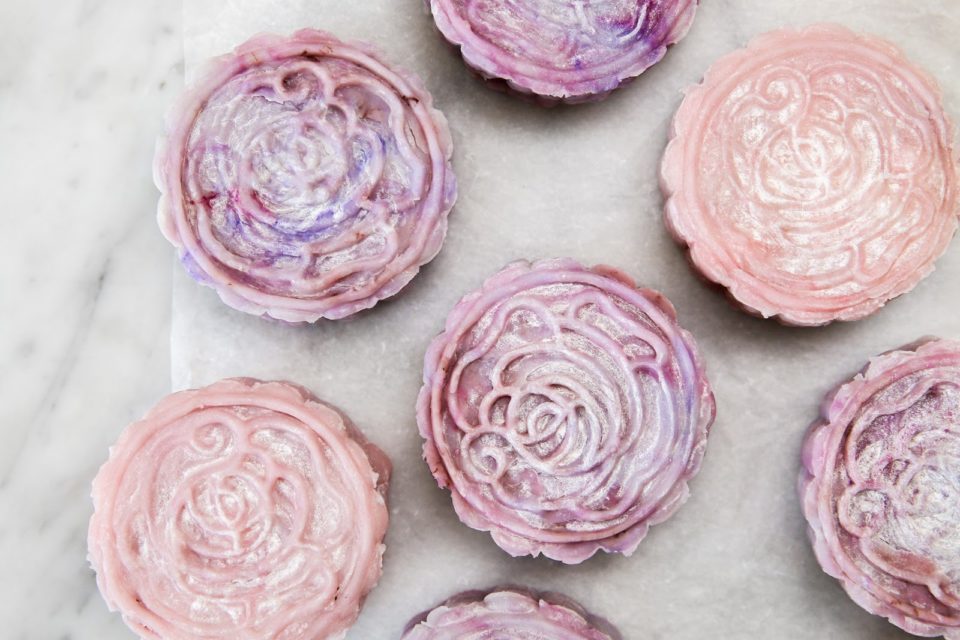
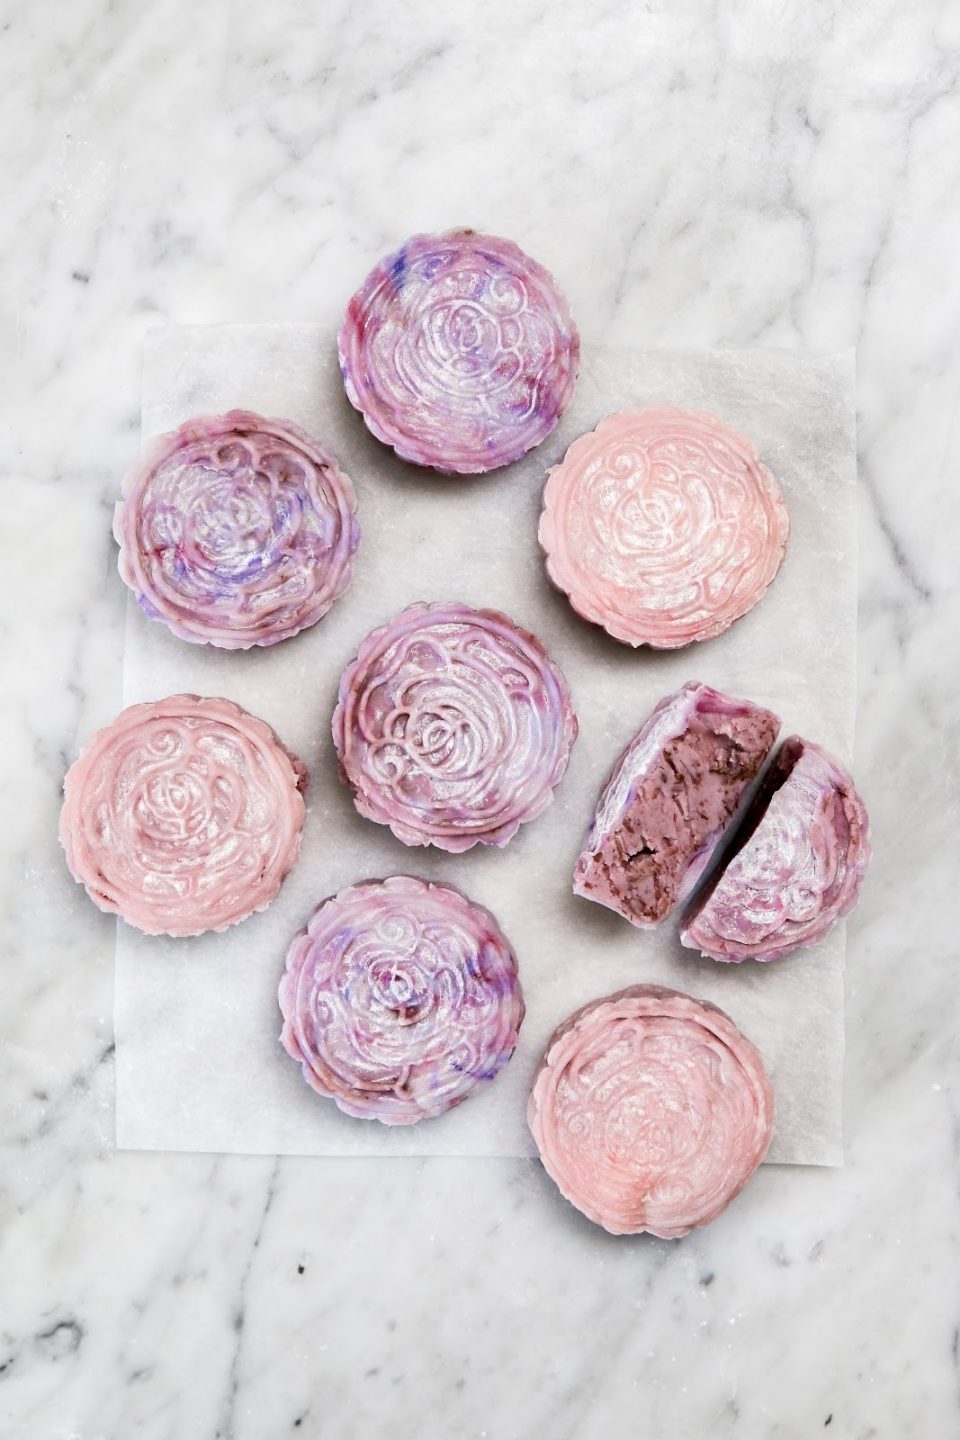
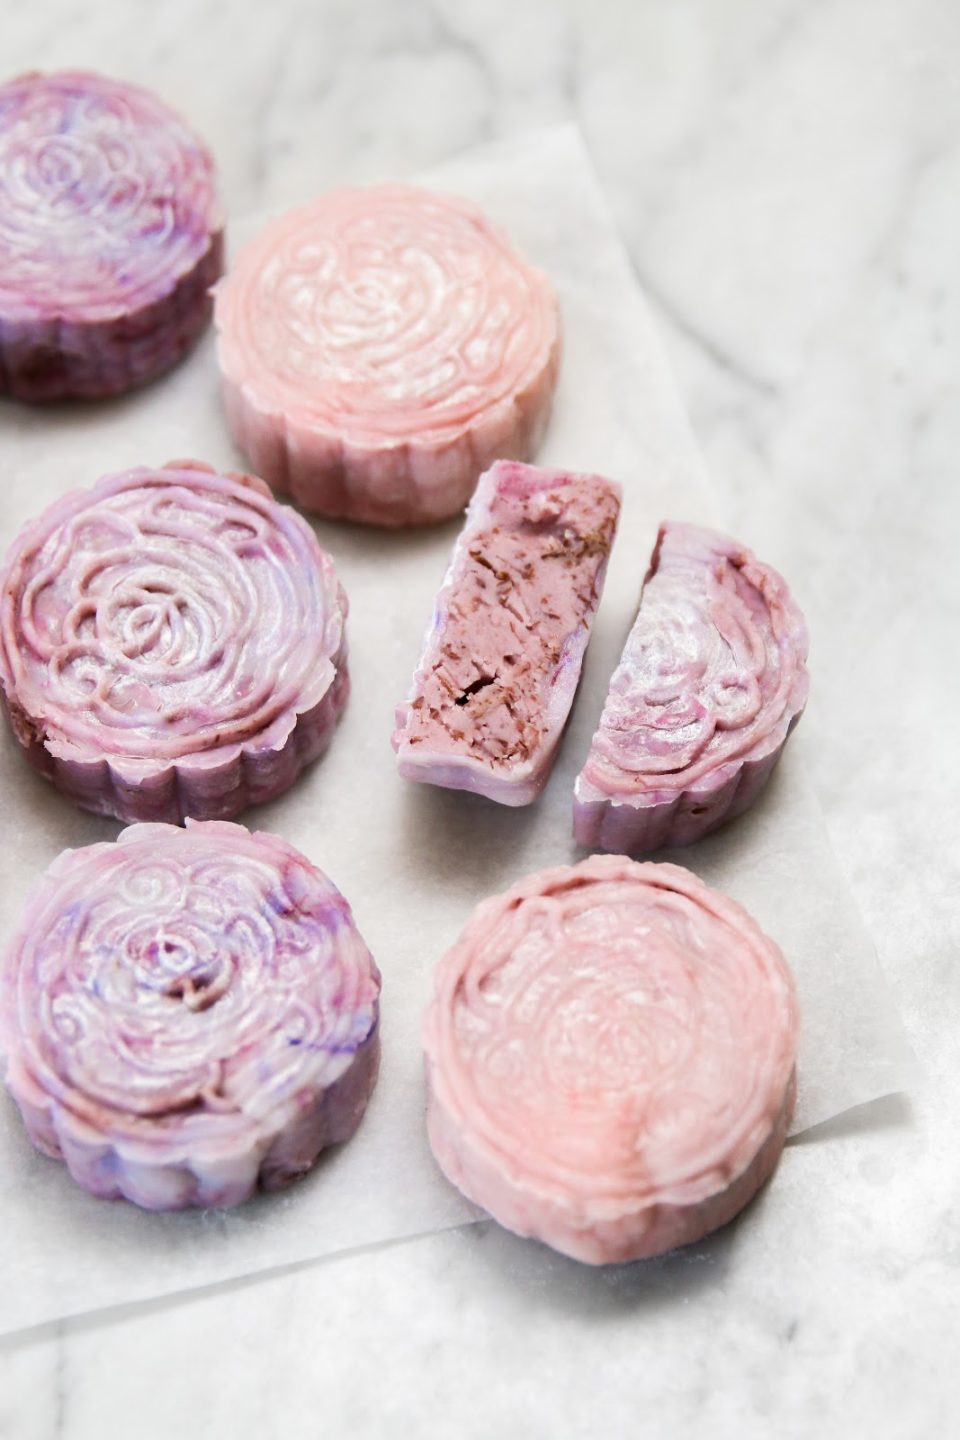
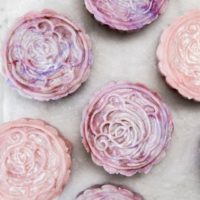
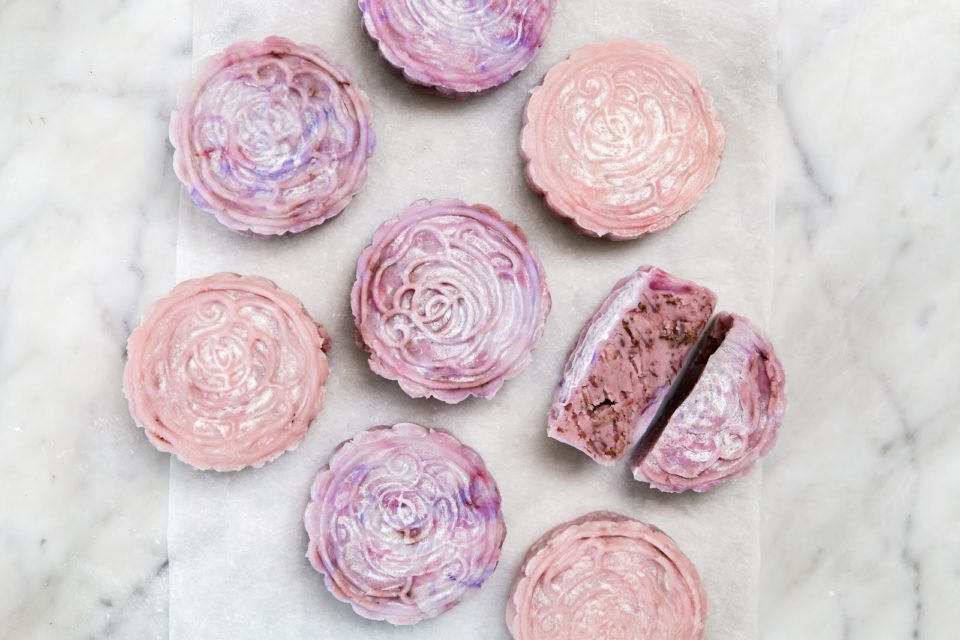
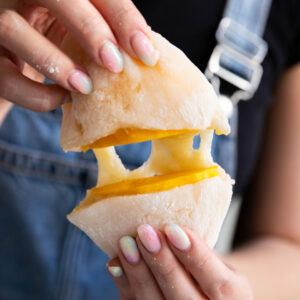
For the mean time, I have these little gems for you. These snowy mooncakes are filled with a velvety taro and coconut mixture. The filling is encased in a soft and chewy wrapper that I coloured pink and purple to match. To achieve the marbling effect for the wrapper, simply add different types of gel food colour to the dough and mix lightly. Mix the dough until the desired marbling is achieved. Working with glutinous rice flour can be tricky because it tends to stick to all the surfaces and your hands. To make the dough more workable, a light dusting of rice flour will do the trick. 

Lastly, I have the recipe written in grams for you instead of cups and teaspoons. Mooncake measurements are finicky and I highly recommend using a scale to weigh out your ingredients for the best mooncakes.

Happy Mid-Autumn Festival!

Taro Coconut Snowy Mooncakes

Makes 8 mooncakes
By Amy

Ingredients

Taro Coconut Filling

  • 340 g taro
  • 1/2 teaspoon kosher salt
  • 1/2 cup granulated sugar
  • 1/8 cup + 1 tablespoon vegetable oil
  • 1/3 cup unsweetened full-fat coconut milk

Snowy Mooncake Wrapper

  • 50 g glutinous rice flour
  • 35 g rice flour
  • 20 g tapioca flour
  • 45 g icing sugar
  • 180 g unsweetened full-fat coconut milk
  • 15 g vegetable oil
  • 1/4 cup toasted rice flour, for dusting

Instructions

Taro Coconut Filling

  • Wash and peel taro root with potato peeler. Wearing gloves for this step is helpful because raw taro can leave skin feely waxy and itchy. Cube taro into 1 inch cubes.
  • Place taro into a steamer or steaming basket. Steam until tender to the fork, roughly 30 – 40 minutes.
  • Remove taro from steamer. Using a fork or potato ricer, mash the taro into a smooth paste.
  • Add salt, sugar, vegetable oil into mixture. Mix until well combined and paste is smooth.
  • Add coconut milk to mixture and mix well. Adjust the consistency of the paste by adding more or less coconut milk.
  • Set aside and let the filling cool. Chill the mixture in the refrigerator until ready to use.

Snowy Mooncake Wrapper

  • In a measuring cup, combine milk and oil
  • In a separate bowl, whisk together glutinous rice flour, rice flour, tapioca flour, and icing sugar.
  • Pour the wet mixture into the dry mixture and mix well, making sure no lumps remain.
  • Strain mixture through fine-meshed sieve.
  • Over medium heat, steam the mixture for around 30 minutes until it becomes slightly transparent.
  • Remove the bowl from the pot and stir the mixture with chopsticks for several minutes until the mixture is glossy and smooth.
  • Transfer dough to a plate and cover with saran wrap. Knead  for several minutes until the surface becomes oily.
  • Form the dough into a disc and refrigerate for at least two hours before assembling the snow skin mooncake. A warm dough is too sticky too handle.

Assembly

  • Weigh out eight 75-gram scoops of taro filling and gently shape each portion into balls. Set aside.
  • Divide and weigh the dough into eight 35-gram pieces.
  • Dust the mooncake mold with toasted rice flour.
  • Wrap the taro filling with wrapper dough and seal completely. Shape into an oval shape, so it will easily slide into the mooncake mold. Dust the bottom of the mooncake ball with more toasted rice flour.
  • Press on the mooncake mold to shape the mooncake. Carefully remove from the mold. If any sides of the mooncake is too tacky, brush on toasted rice flour.

more like this:

Whole Mango Mochi

Salted Honey Pistachio Tangyuan 湯圓 Rice Balls

Grilled Chewy Rice Cake (燒餅)

Reader Interactions

Leave a Reply Cancel reply

Your email address will not be published. Required fields are marked *

Recipe Rating


Sweet Comments:

  1. Nicole Szeto says

    Sep 25, 2018 at 1:03 am

    Did you add food coloring to the mooncake skin?

    Reply
    • amy h. says

      Sep 28, 2018 at 7:23 pm

      i did! or you can use a bit oh purple yam puree to dye it purple 🙂

  2. Unknown says

    Sep 27, 2018 at 3:07 am

    what size molds did you use? 100 g? thanks!

    Reply
  3. amy h. says

    Sep 28, 2018 at 7:23 pm

    yup!

    Reply
  4. Amy says

    Sep 25, 2020 at 9:30 pm

    How did you make your mooncakes into different colors? Also – is there a substitute for the toasted rice flour? I can't find that in the store 🙁

    Reply

Primary Sidebar

a sweet hello.

Welcome to Constellation Inspiration, a buttercream-coated journal of recipes, stories, and love letters that are sweet to read, and even sweeter to eat. These love letters are dedicated to you.

sneak peaks & bonus recipes!

Sign up to get them for free:

featured

day two: sparkly matcha neapolitan shortbread cook day two: sparkly matcha neapolitan shortbread cookies ✨

the instructions might seem confusing, but if you watch the video to see how the different flavour layers are stacked, it will make much more sense! these slice and bake cookies freeze extremely well so you can make the dough now and bake them off when you want to gift them. (makes 40-44)

vanilla dough:
85g (1/3 cup + 2 tsp) unsalted butter, room temp
45g (6 tbsp) powdered sugar
2 tsp vanilla
90g (3/4 cup) all-purpose flour
1/4 tsp salt

matcha dough:
85g (1/3 cup + 2 tsp) unsalted butter, room temp
45g (6 tbsp) powdered sugar
90g (3/4 cup) all-purpose flour
2 tsp culinary matcha powder
1/4 tsp salt

strawberry dough 
85g (1/3 cup + 2 tsp) unsalted butter, room temp
45g 6 tbsp) powdered sugar
90g (3/4 cup) all-purpose flour
2 tbsp freeze-dried strawberry powder 
1/4 tsp salt

1 egg white
coarse sanding sugar

for the vanilla dough, combine butter and powdered sugar in a bowl. mix until smooth. add vanilla. add flour and salt and mix until no dry streaks remain. do the same for the matcha and strawberry doughs in separate bowls

place one portion of the dough between two pieces of parchment paper and roll into a 5 x 9-inch rectangle that is about 1/4-inch thick. slide rolled out dough onto a baking sheet and freeze for 10 min until firm. repeat this step with the other portions of dough

remove the top piece of parchment from each slab and stack the strawberry, vanilla, and matcha dough layers. cut the slab down the middle the long way to form two 2.5 x 9-inch rectangles. with one half, carefully swap the order of the layers (example: if the first half of the dough is stacked svm, swap the second half so it’s msv. this will ensure that same flavour squares don’t stack on each other). stack the halves. press the layers gently to adhere them. return the stacked dough to the freezer for another 10min

[recipe cont’d in comments]

#christmasbaking #christmascookies #holidaybaking #holidaycookies #cookiedecorating
day 1: rudolph rings 🦌✨ piped butter cookies day 1: rudolph rings 🦌✨

piped butter cookies are some of my fav cookies to make — they’re buttery! sandy! rich! they get a little holiday makeover and become the cutest rudolph rings when you add a little red m&m nose and antler details. topping the antlers with gold is optional, but adds extra sparkle and festive cheer to each cookie

(makes 12 cookies)
135 g salted butter, very soft
45 g icing sugar
100 g flour
40 g cornstarch
15 g cocoa powder 
1/4 tsp espresso powder 

in a medium bowl, combine softened salted butter with icing sugar with a rubber spatula until smooth

in a separate bowl, whisk together flour, cornstarch, cocoa powder, espresso powder, and salt

using a rubber spatula, fold in the dry ingredients into the butter-sugar mixture until no more dry spots remain

transfer the dough into a piping bag fitted with a large open star tip (i used wilton 6b)

apply pressure to pipe the dough onto the prepared baking sheet. if you are having trouble piping out the dough, you can warm up the dough in the piping bag between the palms of your hands, or add an extra 1 tbsp of melted butter to the dough and refill the piping bag. leave 1 inch between each cookie

transfer the sheet of piped cookies to the freezer while you preheat the oven to 325f. chilling the dough will prevent the cookies from spreading in the oven

bake the cookies until the bottoms are set, about 25 – 30 minutes

allow the cookies to cool on the baking sheet for 5 minutes before transferring them to a cooling rack to cool completely and decorate

royal icing
1 egg white
150 g icing sugar
1/4 tsp vanilla extract 

in the bowl of a stand mixer or large mixing bowl, beat egg whites on medium-low speed until frothy, about 1 min. with the mixer on low speed, slowly add icing sugar and vanilla. once incorporated, increase speed to medium-high and beat until stiff peaks form. transfer icing to a pip bag with a small round tip to pipe out face details

#holidaybaking #christmascookies #christmascookie #holidaycookies #christmasbaking
sorry i cant come to the phone right now, i’m to sorry i cant come to the phone right now, i’m too busy baking all the @nytcooking holiday cookies the day they’re released

@csaffitz bûche de noël cookies
@samanthaseneviratne ginger cheesecake cookies
@heysueli matcha-black sesame shortbreads
@ericjoonho lemon-turmeric crinkle cookies
@clarkbar iced peppermint cookies
@sohlae holiday rocky road
@vaughn rum-buttered almond cookies

#nytcooking #nytcookieweek #nytcookies #holidaybaking #christmascookies
presenting: this year’s 12 days of christmas coo presenting: this year’s 12 days of christmas cookies 🎄

matcha christmas tree cookies 
chocolate reindeer cookies
matcha strawberry neapolitan checkerboard
hojicha walnut deer cookies (with a bow!)
hedgehog hazelnut praline shortbread
pretzel shortbread mittens
earl grey decorated wreath cookies 
snowman cookie butter truffles
grinchy pistachio jammy liners
eggnog brûlée cookies
biscoff snowman cookies
chestnut hazelnut praline sandwich cookies

…dropping tomorrow! stay tuned!

#christmasbaking #christmascookies #holidaybaking #holidaycookies #cookiedecorating
preparing for the big weekend… ✨ a tradition preparing for the big weekend… ✨

a tradition that i started in 2019, this will be the sixth year i bake all of the @nytcooking holiday cookies the moment they are released on dec 1. i’m excited/nervous for sunday (i might throw up). here are the cookies from previous years, and a few behind the scenes where you can witness me slowly lose my sanity.

2019: twelve cookies by @susanspungen
peppermint stripe cookies
color-field cookies
peanut shortbread with honeycomb
gingery brownie crinkle cookies
marbled tahini cookies
homemade pocky
abstract art cookies
stamped citrus shortbread
brown sugar-anise cookies
thumbprints with dulce de leche
blood orange poppyseed window cookies
dirty chai earthquake cookies

2020:
cornmeal lime shortbread fans
sparkly gingerbread
vanilla bean spritz cookies
toasted almond snowballs
honey-roasted peanut thumbprints
black and white brownies 
fudgy bourbon balls
cherry rugelach with cardamom sugar

2021: the year that @nytcooking released 24 holiday cookie recipes and i almost passed out/away
m&m cookies
almond spritz cookies
peppermint brownie cookies
brown-butter toffee sandwich cookies
hibiscus-spiraled ginger cookies
guava and cream cheese twists
minty lime bars
chewy gingerbread
savory mixed-nut shortbread
tahini thumbprints with dulce de leche
chocolate babka rugelach
fruity meltaways
iced oatmeal cookies
spiced orange crumble cookies
peanut butter cookies
gingerbread biscotti
cheddar cheese coins
fig and cherry cookie pies
italian rainbow cookies
chocolate-cherry ginger cookies
hindbaersnitter
no-bake chocolate clusters
torticas de morón
piparkakut

2022:
white chocolate macadamia nut cookies
gochujang caramel cookies
chocolate hazelnut cookies
gingerbread latte cookies
orange, pistachio and chocolate shortbread
crunchy coconut twists
savory shortbread with olives and rosemary

2023: last year’s seven cookies which was done after ten hours of baking
gingerbread blondies
mexican hot chocolate cookies
rainbow rave cookies
lemon butter curls
matcha latte cookies
technicolor cookies
neapolitan checkerboard

#nytcooking #nytcookies #nytcookieweek #christmascookies #holidaycookies

Footer

Recipe Index
About
Press
Contact
Legal

sneak peeks & bonus recipes!

Sign up to get them for free:

© 2026 Constellation Inspiration · Site by Meyne